Blog Details
Home Blog Details

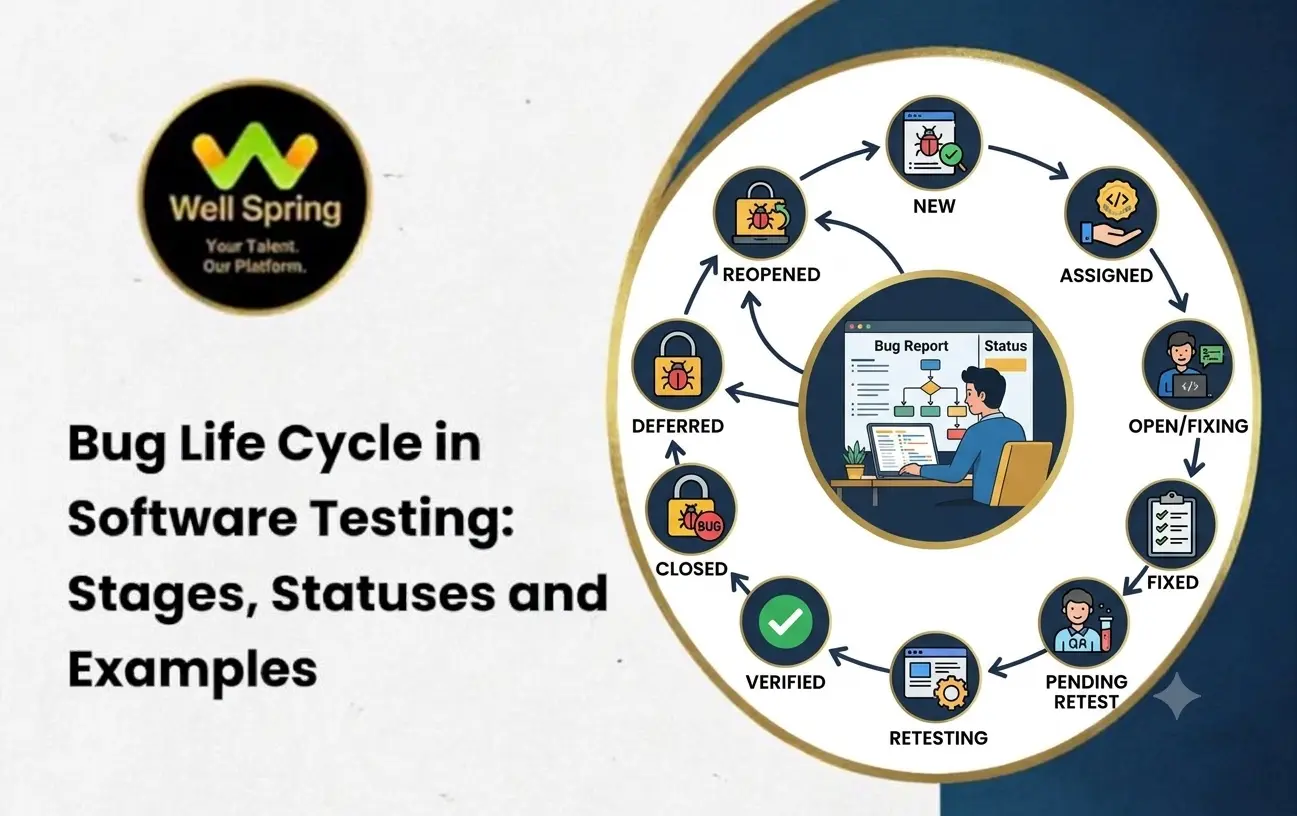
The bug life cycle in software testing describes the different stages a software defect goes through, from the moment a tester identifies and reports it until it is fixed, retested, and closed. Understanding this process helps testers, developers, and project managers track defects systematically and maintain software quality.
During software development, applications may contain errors that cause unexpected behaviour, incorrect results, or system failures. The testing team identifies these issues, documents them in a bug tracking tool, and assigns them to developers for investigation and resolution.
In this guide, you will learn about the software bug life cycle, its stages, common bug statuses, a practical example, and the difference between a bug life cycle and a defect life cycle.
The bug life cycle in software testing is the sequence of steps a defect follows from identification to final closure. It defines how a reported issue is reviewed, assigned, fixed, verified, and managed throughout the testing process.
For example, suppose a tester discovers that a login page accepts an incorrect password and allows a user to access an account. The tester reports the issue, and the developer investigates and fixes it. The tester then retests the application to confirm that the problem has been resolved.
This process ensures that defects are documented, tracked, prioritised, and resolved appropriately.
The bug life cycle is also known as the software bug life cycle or defect life cycle in software testing.
Following a structured bug life cycle helps software teams:
Track defects from reporting to closure.
Improve communication between testers and developers.
Prioritise critical defects that affect application functionality.
Prevent unresolved issues from being overlooked.
Verify whether fixes work as expected.
Maintain a record of defects and their resolutions.
Improve overall software quality and reliability.
The bug life cycle stages may vary depending on the organisation, project requirements, and defect tracking tool. However, most teams follow a process that includes identifying, reporting, assigning, fixing, retesting, and closing defects.
The common stages are explained below.
The New status is assigned when a tester identifies a defect and records it in the bug tracking system.
At this stage, the tester documents the issue with sufficient information to help the development team understand and reproduce it.
A typical bug report includes:
Bug title and description.
Steps to reproduce the issue.
Expected result.
Actual result.
Severity and priority.
Screenshots or supporting evidence.
Browser, operating system, or device details when relevant.
Example: A tester discovers that clicking the Login button does not submit valid credentials. The tester creates a defect report with the New status.
The Assigned status indicates that the reported defect has been allocated to a developer or another responsible team member for investigation.
The assigned person reviews the defect, checks the reported behaviour, and determines the next steps.
Example: The testing team reports the login issue, and the project manager assigns it to the developer responsible for the authentication module.
The Open status indicates that the defect has been accepted for investigation or resolution and is awaiting further work.
The developer analyses the issue, identifies its root cause, and determines how to correct it.
Example: The developer investigates the login problem and discovers that the authentication function is not processing the submitted password correctly.
Note: Some organisations use Open immediately after New, while others use Assigned first. The exact sequence depends on the team's defect management workflow.
The Fixed status indicates that the developer has implemented a correction for the reported defect.
The fix is generally made available in a test environment so that the testing team can verify whether the issue has been resolved.
However, a defect marked Fixed is not necessarily closed. The tester must still validate the correction.
Example: The developer corrects the authentication logic and deploys the updated application to the testing environment.
The Retest stage begins when the tester checks the application again after the developer has fixed the reported issue.
The tester follows the original reproduction steps and verifies whether the actual result now matches the expected result.
Depending on the defect, the tester may also perform regression testing to check whether the fix has affected other features.
Example: The tester enters valid login credentials and confirms that the application opens the dashboard successfully.
If the issue is resolved, the defect can move to Closed. If the problem persists, it may be reopened.
The Verified status indicates that the tester has confirmed that the reported defect has been resolved.
Some teams use Verified after successful retesting and before closure. Other teams combine verification and closure into a single step.
Example: The tester confirms that valid credentials allow access and that incorrect credentials display the appropriate error message.
The Closed status indicates that the defect has been resolved and the required verification has been completed.
The testing team or another authorised team member closes the defect according to the project's workflow.
Example: After successful retesting, the tester updates the defect report to Closed.
The issue is now considered resolved unless it is discovered again or a related problem is reported.
The Reopened status is used when a previously fixed or closed defect occurs again or the original issue has not actually been resolved.
The defect is returned to the responsible developer for further investigation and correction.
Example: The developer fixes the login issue, but the tester discovers that the application still accepts an incorrect password under a particular condition. The tester reopens the defect with updated evidence.
The developer must investigate the remaining problem and provide another fix.
The following sequence illustrates a common bug tracking process:
New → Assigned → Open → Fixed → Retest → Verified → Closed
If the issue persists during retesting, the workflow may follow this alternative path:
Fixed → Retest → Reopened → Assigned/Open → Fixed → Retest → Closed
The exact status names and transitions can differ between teams and bug tracking tools.
Bug statuses describe the current state of a defect in the tracking system. Understanding these statuses helps testers monitor progress and communicate effectively with developers.
The following table explains commonly used statuses.
| Bug Status | Meaning |
|---|---|
| New | A defect has been reported and recorded. |
| Assigned | The defect has been allocated to a responsible team member. |
| Open | The defect is accepted for investigation or resolution. |
| Fixed | The developer has implemented a correction. |
| Retest | The tester is checking whether the fix works. |
| Verified | The tester has confirmed that the defect is resolved. |
| Closed | The defect has completed the required resolution and verification process. |
| Reopened | The original issue persists or occurs again after being fixed. |
| Rejected | The report is determined not to represent a valid defect. |
| Duplicate | The same issue has already been reported. |
| Deferred | The team postpones the fix to a later release or development cycle. |
| Not Reproducible | The team cannot reproduce the reported issue using the available information and environment. |
| Cannot Fix | The team determines that the issue cannot be fixed under the current constraints or design. |
Not every project uses all these statuses. The available statuses depend on the team's defect management policy and the configuration of its tracking tool.
Bug severity and bug priority are two important attributes used during defect management. Although they are related, they describe different aspects of a defect.
Severity indicates how seriously a defect affects the application's functionality, stability, security, or usability.
Common severity levels include:
Critical: The defect causes a major system failure or serious security issue.
High: An important feature is not functioning correctly.
Medium: A feature has a noticeable problem, but a workaround may be available.
Low: The defect has a minor impact, such as a small visual inconsistency.
Priority indicates how urgently a defect should be addressed.
Common priority levels include:
High: The issue requires immediate attention.
Medium: The issue should be resolved within the planned development cycle.
Low: The issue can be addressed later when resources are available.
Suppose an online shopping application displays the wrong total price during checkout.
This issue may have high severity because it affects the correctness of a core business function. It may also have high priority because it could affect customer purchases.
Now consider a minor alignment issue on a rarely visited informational page. Its severity and priority may both be low.
However, a defect's severity and priority do not always match. A minor visual issue on the homepage of an important product launch could receive high priority because of its business impact.
Consider an online shopping application with a login page.
A tester discovers that the application allows a user to log in with an incorrect password under a particular condition.
The following example demonstrates how the defect moves through the bug life cycle.
The tester enters a registered email address and an incorrect password. The application unexpectedly opens the user's account.
The tester confirms that the behaviour is incorrect.
The tester creates a defect report containing the issue description, steps to reproduce it, expected result, actual result, and supporting evidence.
The defect is assigned the New status.
The team reviews the report and assigns it to the developer responsible for the authentication functionality.
The defect moves to Assigned.
The developer investigates the authentication logic, identifies the cause, corrects the problem, and makes the updated version available for testing.
The defect is marked Fixed.
The tester checks the login functionality using valid and invalid passwords.
The application now allows access only when the credentials are valid and displays an appropriate error message for an incorrect password.
The tester records the successful retest.
After confirming that the issue is resolved, the tester updates the defect status to Verified and then Closed, if the project uses both statuses.
The bug life cycle is complete.
Example workflow:
| Stage | Action | Status |
|---|---|---|
| 1 | Tester identifies the login issue. | New |
| 2 | Defect is assigned to a developer. | Assigned |
| 3 | Developer investigates the issue. | Open |
| 4 | Developer corrects the authentication logic. | Fixed |
| 5 | Tester checks the updated application. | Retest |
| 6 | Tester confirms that the fix works. | Verified |
| 7 | Defect is completed and closed. | Closed |
If the tester discovers that the application still allows an incorrect password, the defect is reopened and returned for further investigation.
The bug tracking process is the method used to record, monitor, assign, and manage defects throughout software development and testing.
A structured process helps teams understand the current status of each defect and ensures that important issues receive appropriate attention.
The typical bug tracking process includes the following activities.
The tester identifies unexpected behaviour and records the details needed to reproduce the problem.
The team checks whether the issue is valid and determines its severity, priority, and appropriate owner.
The defect is assigned to a developer or another responsible team member.
The developer investigates the root cause and implements a suitable correction.
The tester checks whether the original issue has been resolved and performs additional testing when necessary.
The defect report is updated to reflect the current stage of the resolution process.
If the fix is successful, the defect is closed according to the project's workflow. If the issue persists, it is reopened for further investigation.
Bug tracking tools help testing and development teams document defects, assign responsibilities, monitor progress, and maintain a record of issues.
Some commonly used tools include:
Jira is widely used for issue tracking and project management. Teams can configure workflows, assign defects, set priorities, and monitor progress through dashboards and reports.
Bugzilla is an issue tracking system used to report defects, manage assignments, track status changes, and organise bug reports.
Azure DevOps provides work item tracking capabilities that allow teams to record bugs, assign them to team members, manage priorities, and monitor resolution.
MantisBT is a web-based bug tracking system that supports defect reporting, status management, notifications, and team collaboration.
GitHub Issues allows development teams to report bugs, organise tasks, assign responsibilities, and track issues associated with software repositories.
The best tool depends on the team's development process, project requirements, collaboration needs, and existing technology stack.
The terms bug life cycle and defect life cycle are often used interchangeably in software testing. Both describe the process of managing a reported problem from identification through investigation, resolution, and closure.
However, some teams use the terms slightly differently depending on their testing standards and workflows.
| Bug Life Cycle | Defect Life Cycle |
|---|---|
| Commonly describes the progression of a software bug through different statuses. | Often used to describe the broader process of managing a defect. |
| Focuses on identifying, assigning, fixing, retesting, and closing bugs. | May also include defect classification, prioritisation, root cause analysis, and reporting. |
| Commonly discussed in practical software testing scenarios. | Frequently used in formal defect management processes. |
| Status names depend on the project workflow. | Status names also depend on the organisation's workflow. |
In practice, there is no universal distinction between these terms. The meaning depends on how an organisation defines its testing and defect management processes.
Effective bug management requires accurate reporting, clear communication, and consistent tracking throughout the testing process.
The following practices help improve defect resolution.
Use a descriptive title, reproducible steps, expected results, actual results, and relevant screenshots. Clear reports help developers investigate issues more efficiently.
Assess the impact of each defect and determine how urgently it needs to be resolved. Consider technical consequences, user impact, security risks, and business requirements.
Search existing defect records before reporting a new issue. If the same problem has already been reported, add relevant information to the existing record when appropriate.
Verify that the reported problem has been corrected. Perform regression testing when necessary to check whether the fix has affected related functionality.
Update the tracking system whenever the defect moves to another stage. Accurate statuses help the team monitor progress and identify unresolved issues.
Provide additional information when requested and collaborate with developers to reproduce, investigate, and verify defects.
Review repeated issues to identify underlying causes, improve development practices, and prevent similar defects in future releases.
The bug life cycle in software testing is an essential part of software quality assurance. It provides a structured approach to identifying, reporting, assigning, fixing, retesting, and closing defects.
Understanding common bug life cycle stages and statuses helps testers manage defects more effectively and communicate clearly with developers. Practical knowledge of bug tracking tools, severity, priority, and defect reporting is also valuable for anyone preparing for a software testing role.
For beginners, the best way to understand the software bug life cycle is to practise creating bug reports, tracking status changes, and verifying fixes using a sample application.
With consistent practice, you can develop the practical software testing skills needed to work effectively with development teams and contribute to software quality.

21 Nov 2026
21 Nov 2026

19 Nov 2026
19 Nov 2026
18 Nov 2026
The bug life cycle in software testing is the sequence of stages a software defect follows from identification and reporting through assignment, investigation, fixing, retesting, and closure.
Common stages include New, Assigned, Open, Fixed, Retest, Verified, and Closed. Reopened is used when the original issue persists or occurs again. The exact stages depend on the team's workflow.
The terms are frequently used interchangeably in software testing. Both generally refer to an issue in software that causes its behaviour or output to differ from the expected result.
A bug is reopened when the original issue has not been resolved or appears again after a fix. The developer must investigate the problem and provide another correction before the tester retests it.
Fixed means the developer has implemented a correction. Closed means the defect has completed the required verification and closure process. A fixed defect may still require retesting before it can be closed.
Severity describes the impact of a defect on the application, while priority indicates how urgently the team should resolve it. Both attributes help determine the appropriate response to a reported issue.
Common bug tracking tools include Jira, Bugzilla, Azure DevOps, MantisBT, and GitHub Issues. These tools help teams document defects, assign responsibilities, track statuses, and monitor resolutions.
Yes. A bug may be rejected if the reported behaviour is expected, the report is invalid, or the issue does not meet the project's defect criteria. The reason should be documented clearly.
No. The workflow varies depending on the project, organisation, testing methodology, and tracking tool. Some teams use additional statuses, while others combine stages such as Verified and Closed.
The bug life cycle helps testers track defects systematically, communicate with developers, verify corrections, prevent unresolved issues from being overlooked, and contribute to the delivery of reliable software.
We provide IT training, internships, and online learning for students in Trichy and across India.
We also welcome enquiries from students in these neighbourhoods, towns, and surrounding locations.
Can't attend classes in person? Explore online IT training opportunities with Well Spring Talent Solutions, designed to help learners develop practical technology skills from different locations across India.
Get internship updates, IT training news, placement opportunities, and career tips directly to your inbox.
Join our WhatsApp community for internship updates, IT courses, placement support, and latest job opportunities.
Join Now