
Cantonment Branch
77, C4, St. Pauls Complex,
Pudukottai Main Road, Bharathiyar Salai,
Cantonment, Tiruchirappalli,
Tamil Nadu 620001

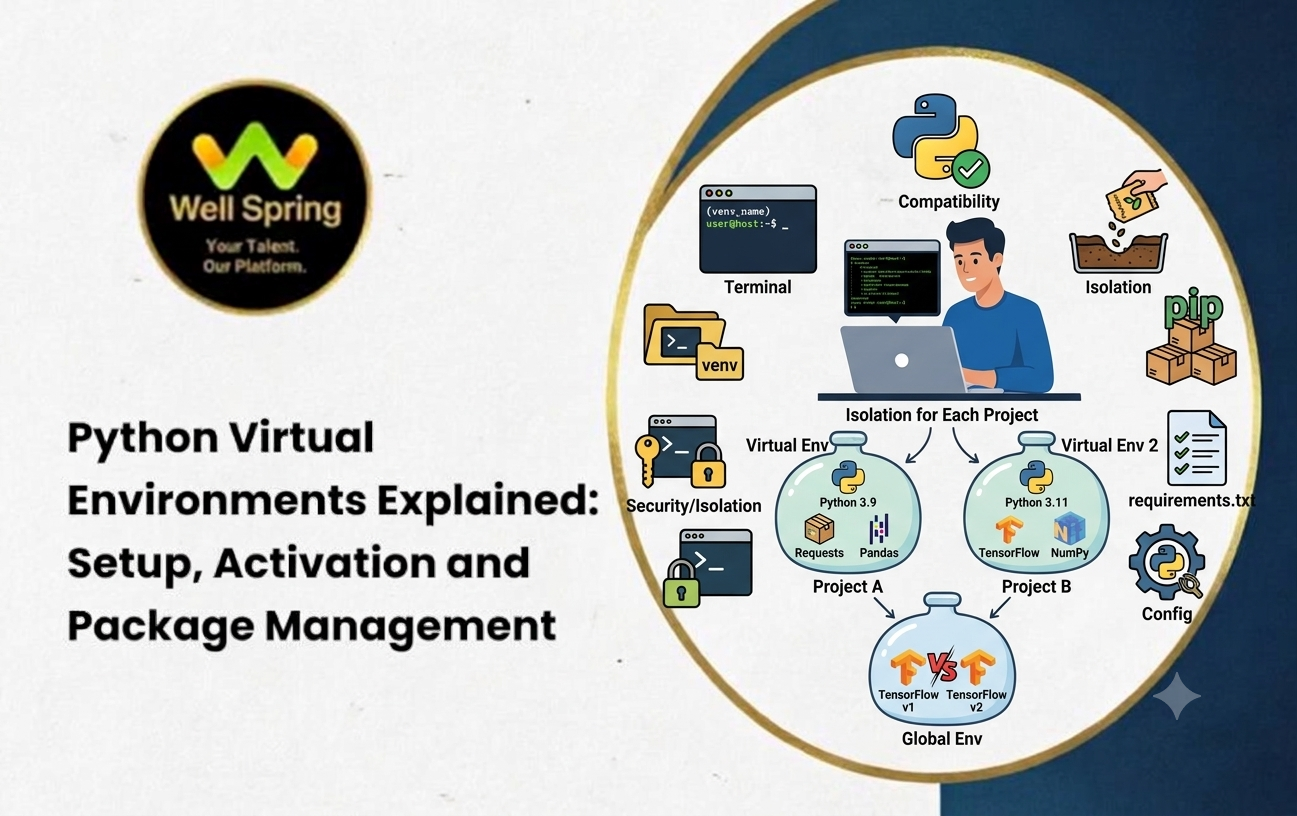
Imagine working on two Python projects. One application requires an older version of a library, while another depends on a newer version. If both projects use the same global Python package installation, changing a dependency for one project could affect the other.
This is a common challenge when learning Python or developing multiple applications. A Python virtual environment solves the problem by providing a separate environment for each project, allowing packages to be installed and managed independently.
Virtual environments are useful for students, backend developers, data analysts, automation engineers, and anyone building Python applications. They also make it easier to document dependencies and prepare a project for another developer to run.
This guide explains what a Python virtual environment is, how to create a virtual environment in Python, how to activate and deactivate it on different operating systems, and how to manage packages using pip and requirements.txt.
A Python virtual environment is an isolated environment for a Python project that maintains its own set of installed packages separately from other project environments. Python's built-in venv module is the standard way to create one.
For a typical project, run python -m venv .venv to create the environment, activate it using the appropriate command for your operating system, and install dependencies with python -m pip install package-name.
1. What Is a Python Virtual Environment?
A Python virtual environment is a project-specific environment that isolates installed Python packages from those in other environments.
When you create an environment with venv, Python sets up a dedicated directory containing the environment configuration, an interpreter or interpreter link, and the package installation location. The environment uses an existing base Python installation rather than duplicating every part of the Python standard library.
Project A uses Flask for a small web application and depends on a particular Flask version.
Project B uses Django for a separate application and requires a different combination of dependencies.
With separate virtual environments, each project can maintain its own installed package versions without unnecessarily changing the other project's environment.
What does venv mean?
venv is Python's built-in module for creating virtual environments. It is available in Python 3.3 and later, and it is generally the simplest choice for beginners because it does not require a separate environment-management package.
The Python Packaging User Guide recommends using a virtual environment when working with third-party packages. You can read its instructions in the official virtual environment guide.
2. Why Do Python Projects Need Virtual Environments?
A virtual environment is more than a way to organise folders. It helps prevent dependency conflicts and makes project setup easier to manage.
Different projects may require different versions of the same library. Separate environments let you install the versions each project needs without intentionally sharing those project dependencies.
Installing every development package globally can make it harder to understand which project needs which dependency. A virtual environment keeps most project-specific installations separate from the global environment.
A requirements file can list the packages needed by a project. Another developer can create a new environment and install those dependencies instead of trying to reproduce your setup manually.
When learning Python, you may want to try a new package or test a different version. Doing this in a project-specific environment reduces the chance of disrupting other projects.
Developers can create separate environments for applications with different dependency requirements. This can be particularly useful when maintaining older projects while developing new features.
Important limitation: A virtual environment does not automatically isolate operating-system libraries, databases, external services, environment variables, or every system-level dependency. It primarily separates Python package installations and the environment-specific Python executable.
Before creating an environment, make sure Python is installed and accessible from your terminal.
Open a terminal or command prompt and try the appropriate command.
py --version
macOS or Linux:
python3 --version
Depending on your installation, python --version may also work. If the command is not recognised, check the Python installation and your system's PATH configuration.
Create a folder for your application and move into it.
mkdir expense_tracker
cd expense_tracker
This example uses a simple expense-tracking application as the project.
Use the command appropriate for your operating system.
py -m venv .venv
macOS or Linux:
python3 -m venv .venv
The command creates a directory named .venv inside your project folder. The leading dot is commonly used to keep the directory less prominent in Unix-like file listings.
You can choose another name, such as venv or env, but .venv is a common convention.
After creating the environment, your project may look similar to this:
expense_tracker/
├── .venv/
├── app.py
└── requirements.txt
The .venv directory contains the environment's files. app.py will hold the application code, while requirements.txt will document its dependencies once you create that file.
You do not need to create requirements.txt immediately. It is shown here to illustrate the structure of a project that manages dependencies.
Creating a virtual environment and activating it are separate steps. Activation adjusts the current shell so that the environment's Python executable and package-management commands are selected by default.
Run:
.venv\Scripts\activate.bat
Windows PowerShell
Run:
.\.venv\Scripts\Activate.ps1
If PowerShell blocks the activation script because of its execution policy, follow your organisation's or system administrator's guidance for script permissions. You can use Command Prompt instead if that suits your setup.
macOS and Linux
Run:
source .venv/bin/activate
After successful activation, the terminal prompt often displays (.venv) or the environment's name.
Run:
python --version
python -m pip --version
The package manager's reported location should point inside your .venv directory. You can also inspect the Python executable.
where python
macOS or Linux:
which python
These commands help confirm that the shell is using the intended interpreter.
Do you always need to activate the environment?
No. Activation is a convenience rather than a requirement. You can run the environment's Python executable directly when necessary.
For example, on macOS or Linux:
.venv/bin/python app.py
On Windows:
.venv\Scripts\python.exe app.py
This can be useful in scripts, automated tasks, or development tools where you want to specify the interpreter explicitly.
Once the virtual environment is active, you can install the packages required by your application.
Install a package
For example, to install the requests library, run:
python -m pip install requests
Using python -m pip helps ensure that pip runs through the Python interpreter selected by your current shell.
Confirm the installation
Run:
python -m pip show requests
This displays information about the installed package, including its version and installation location.
You can also test whether the library imports correctly:
python -c "import requests; print(requests.__version__)"
If the command prints a version number without an import error, the selected Python environment can import the package.
View installed packages
Use:
python -m pip list
This shows the packages installed in the active environment, along with their versions.
Upgrade a package
If you intentionally want to upgrade a package, run:
python -m pip install --upgrade requests
Before upgrading dependencies in an existing project, check whether the new version is compatible with your application and its other libraries.
Uninstall a package
To remove a package from the active environment, use:
python -m pip uninstall requests
Review the confirmation prompt before proceeding.
Why does the installation location matter?
If a package is installed globally by mistake, your project may work on your machine even though its environment does not contain the expected dependency. This can create problems when another developer or a deployment environment attempts to run the application.
Activating the correct environment and using python -m pip reduces this risk.
A project may rely on several third-party libraries. Rather than remembering every package and installation command, you can record dependencies in a requirements.txt file.
This file helps another developer install the dependencies needed for the project. For repeatable installations, teams should also decide which versions to pin and how to manage transitive dependencies.
Suppose your expense tracker uses requests and python-dotenv.
python -m pip install requests python-dotenv
These libraries serve different purposes: requests makes HTTP requests, while python-dotenv can load configuration values from a .env file during development.
Run:
python -m pip freeze > requirements.txt
This records the installed distributions and versions visible to pip in the active environment. The file may include packages beyond those directly imported by your application, so review it before treating it as a carefully curated dependency specification.
It may contain entries similar to:
requests==2.32.0
python-dotenv==1.0.1
The versions above are illustrative examples, not a claim that these are the latest releases or the appropriate versions for every project. The actual output depends on the packages installed in your environment.
After creating and activating a fresh environment, run:
python -m pip install -r requirements.txt
Pip reads the listed requirements and installs the specified packages, subject to their availability and compatibility with the Python version and operating system.
Does requirements.txt guarantee a perfectly identical environment?
Not always. It helps record package versions, but complete reproducibility may also depend on the Python version, operating system, system libraries, package indexes, and other configuration.
For a production application, document the supported Python version and use a dependency-management process appropriate to the project's complexity. Teams with stricter reproducibility requirements may use lock files or tools that provide more comprehensive dependency resolution.
Deactivate the environment
When you finish working on the project, run:
deactivate
The shell returns to its previous Python selection. This command does not uninstall packages or delete the environment.
If the environment already exists, there is no need to create it again. Move into the project directory and run the relevant activation command from Section 4.
Sometimes an environment becomes difficult to repair, or you need to rebuild it from the project's dependency records. You can remove the environment directory and create a fresh one.
First, deactivate the environment if it is active. Then remove the .venv directory using the appropriate file-management tool or command for your operating system. Take care to target only the intended project environment.
py -m venv .venv
macOS or Linux:
python3 -m venv .venv
Activate it and reinstall the recorded dependencies:
python -m pip install -r requirements.txt
This is one reason to keep dependency records outside the environment directory: you can rebuild the environment without losing the project's dependency list.
Possible cause: Python is not installed, or the terminal cannot find the interpreter through PATH.
Solution: Verify the installation and try py --version on Windows or python3 --version on macOS or Linux. If Python is installed but the command still fails, check your installation configuration.
Possible cause: The Python installation may not include the venv module or its required components.
Solution: Check the Python distribution and installation method. On some Linux distributions, the virtual-environment support may need to be installed through the operating system's package manager. Follow the instructions for your distribution.
Possible cause: PowerShell's execution policy prevents the script from running.
Solution: Review the execution policy and follow the applicable security guidance. If you cannot or should not change the policy, use Command Prompt or invoke the virtual environment's Python executable directly.
Possible cause: The package may have been installed into a different Python environment from the one running your code.
Solution: Activate the intended environment and inspect the interpreter and pip locations.
python -c "import sys; print(sys.executable)"
python -m pip --version
Install the missing dependency through the same interpreter if it is genuinely absent.
Error 5: The project works locally but fails on another machine
Possible cause: Required dependencies, Python versions, environment variables, or operating-system requirements may differ.
Solution: Maintain an accurate dependency file, document the supported Python version, and test setup instructions in a fresh environment. Avoid relying on packages installed globally on your development machine.
Possible cause: The environment was created using a different Python interpreter than intended.
Solution: Check which Python versions are installed and create the environment using the required interpreter. For example, where the relevant Python version is available:
python3.12 -m venv .venv
The command works only if python3.12 is available under that name on your system. A virtual environment does not automatically upgrade its base Python interpreter when a new Python version is installed.
Create one environment per project. This reduces dependency conflicts between applications with different requirements.
Use a consistent environment name. A folder such as .venv makes project setup easier for collaborators to recognise.
Exclude the environment from version control. Add .venv/ to your .gitignore file rather than committing the entire environment directory.
Document dependencies. Maintain a suitable requirements file or dependency configuration so that the environment can be recreated.
Use the intended Python interpreter. Run python -m pip from the active environment to reduce the risk of installing packages into the wrong location.
Record the supported Python version. This helps collaborators avoid incompatibilities between interpreter versions.
Avoid unnecessary global installations. Keep project-specific dependencies inside the relevant environment whenever practical.
Test setup instructions from a clean environment. A project should not depend on undocumented packages left over from previous work.
Keep secrets out of source control. If your application uses environment variables or a .env file, do not commit credentials or sensitive configuration values.
Review dependency upgrades. Test important changes before updating the versions used by an application.
Following these practices helps make development environments easier to understand, share, and maintain.
A Python virtual environment is a practical foundation for organised Python development. It lets you manage project-specific packages, reduce dependency conflicts, and document the setup needed to run an application.
Start by creating a .venv directory with Python's built-in venv module, activate it for your operating system, and install packages through the environment's interpreter. Then maintain a dependency file, verify your interpreter paths, and test your setup instructions before sharing the project.
For learners developing programming and backend skills, Well Spring Talent Solutions can be explored as a learning option. Practising virtual environment setup alongside Python fundamentals, package management, API development, and database integration will help you build more reliable and maintainable projects.

31 Oct 2026

31 Oct 2026
30 Oct 2026

29 Oct 2026

29 Oct 2026
A Python virtual environment separates project-specific package installations from those of other environments. It helps prevent dependency conflicts, supports project-specific package versions, and makes it easier to document and recreate development setups.
Yes. The venv module is part of the Python standard library in Python 3.3 and later. However, some operating-system Python installations may require an additional system package to provide virtual-environment support.
On Windows Command Prompt, use .venv\Scripts\activate.bat. In Windows PowerShell, use .\.venv\Scripts\Activate.ps1. On macOS or Linux, use source .venv/bin/activate.
venv creates a virtual environment, while pip installs and manages Python packages. They work together: create the environment with venv, activate it, and use pip through the environment's Python interpreter to install project dependencies.
Usually, no. The environment directory contains local interpreter and package files that can be recreated on another machine. Commit the application source code and the appropriate dependency records instead, and add .venv/ to .gitignore.
Yes. You can create separate environments for different projects and activate the one you need when switching tasks. Each environment can maintain its own set of installed packages.
Activation changes the current shell's environment so that commands such as python and pip usually refer to the virtual environment. It does not normally replace or modify the system-wide Python installation.
We provide IT training, internships, and online learning for students in Trichy and across India.
Can't attend classes in person? Explore online IT training opportunities with Well Spring Talent Solutions, designed to help learners develop practical technology skills from different locations across India.
Get internship updates, IT training news, placement opportunities, and career tips directly to your inbox.
Join our WhatsApp community for internship updates, IT courses, placement support, and latest job opportunities.
Join NowVisit our branches in Tiruchirappalli for IT training and career guidance.
77, C4, St. Pauls Complex,
Pudukottai Main Road, Bharathiyar Salai,
Cantonment, Tiruchirappalli,
Tamil Nadu 620001
2nd Floor, C56, 4th Cross Rd W, opp. Poorvika Mobiles, Thillai Nagar, Tiruchirappalli,
Tamil Nadu 620018
YVD Complex, chatram bus stand, No. 15, Tiruchirappalli,
Tamil Nadu 620002, India
16, 1st Cross Road, Anna Nagar, Tiruchirappalli,
Tamil Nadu 620007